Sunday, January 29, 2012

Puff Pastry Sandwiches

As I've mentioned before, I love hosting dinner parties...well, gatherings most likely. I love having a reason to finally make that recipe that's been on my mind for weeks or rising to the challenge of finding a dish that suits the many different dietary preferences of the guests. 


So during my winter trip back home to Chicago over the holidays, a bunch of us were getting together and I was finally able to make the puff pastry "sandwich" I'd been eye by Barefoot Contessa for months. And I was able to create my own vegetarian version so everyone could enjoy.


Ingredients
For the Ham and Cheese pastry:
1 package (2 sheets) Pepperidge Farm frozen puff pastry, thawed
2 tbsp. Dijon mustard
1/4 lb. honey ham, sliced thin
1/2 lb. Muenster cheese, sliced thin (*you can use any flavorful cheese you like)
1 egg + water for the egg wash (*you can use the same wash for both pastries)


Directions
1. Preheat the oven to 450 degrees. Line two baking sheets with parchment paper and set aside.
2. Begin with one puff pastry sheet. Lightly flour a surface and gently roll out to approximately 10"x12". Transfer it to the baking sheet.
3. Brush the Dijon mustard evenly across the pastry sheet, leaving a 1" border around all the edges.
4. Layer the ham slices evenly across the pastry sheet, overlapping slightly, and leaving a 1" border.

5. Top the ham with the slices of cheese, continuing to leave that 1" border.
6. Roll out the second pastry sheet to the same size and transfer on top of the layers of ham and cheese.
7. Using a fork, crimp the edges with the tines to close the pastry, creating a pocket.
8. Brush the top with the egg wash and, with a sharp knife, make a few small slits in the top sheet so steam can escape.
9. Crack salt and black pepper over the top of the pastry sheet.
10. Bake for 20-25 minutes, until puffed and golden brown.
11. Let stand for a few minutes and then cut into easy-to-handle squares. Serve hot or warm.

For the Vegetarian "Pizza" pastry:
1 package (2 sheets) Pepperidge Farm frozen puff pastry, thawed
3-4 tbsp. marinara sauce (*I like garlic or tomato and basil flavors)
1/4 large white onion, thinly sliced
1 red bell pepper, thinly sliced
4-5 cremini mushrooms, thinly sliced
1 small zucchini, thinly sliced
3 cloves garlic, minced
1/2 lb. mozzarella cheese, sliced thin

Directions
1. Keep the oven at 450 degrees.
2. Thinly slice the vegetables and mince the garlic.
3. Heat olive oil in a medium skillet and saute the vegetables until just softened.
4. Roll out one puff pastry sheet to approximately 10"x12," and transfer it to the baking sheet.
5. Brush the marinara sauce evenly across the pastry sheet, leaving a 1" border around all the edges.
6. Lay the vegetables down across the pastry sheet, leaving a 1" border.
7. Top with the mozzarella cheese slices, continuing to leave that 1" border.
8. Roll out the second pastry sheet to the same size and transfer to cover the vegetables and cheese.
9. Using a fork, crimp the edges with the tines to close the pastry, creating a pocket.
10. Brush the top with the egg wash and, with a sharp knife, make a few small slits in the top sheet so steam can escape.
11. Crack salt and black pepper over the top of the pastry sheet.
12. Bake for 20-25 minutes, until puffed and golden brown.
13. Let stand for a few minutes and then cut into easy-to-handle squares. Serve hot or warm.

Cream Cheese Cutouts

What to do when it's Christmastime and you have cream cheese left over from another recipe? You make cream cheese cutouts! They were so soft and chewy, they were perfect with a cup of morning coffee!


Ingredients
1 cup butter, at room temperature
3 oz. cream cheese, at room temperature
1 cup granulated sugar
1 egg yolk
1 tsp. almond extract
2 1/2 cups all-purpose flour


Directions
1. In a medium mixing bowl, cream together the butter and cream cheese.
2. Add the sugar, egg yolk and almond extract, and mix until combined.
3. Add the flour in a couple batches, mixing until just combined.
*Note: do not overmix or the cookies will come out stiff
4. Pack the dough into a ball and wrap in saran wrap. Refrigerate for a few hours or overnight.
5. Preheat the oven to 350 degrees.
6. Remove from refrigerator and roll out to 1/4" thick on a well-floured surface.
7. Cut out with your preferred cookie cutter shapes.
8.  On a baking sheet lined with parchment paper, bake for 10 minutes.
9. Decorate with icing, sprinkles, or whatever else you have on hand.

Cran-Pistachio Cookies

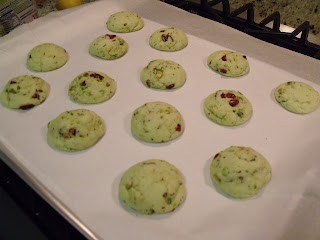
Alright, I recognize it's nearly the end of January, and that means that I'm about 30 days late on posting the new Christmas cookie recipes I made for 2011. But since Christmas is guaranteed to come back around in just under 340 days (did I do that right?), we could say that I'm just really early in posting for next year!


I revisited many of the old favorites (like gumdrops and caramels) that I either make out of request by friends and family or make for myself because, hey, it's the holidays right? But this recipe was a new addition to the list, and with its green dough and red cranberries studded throughout, it will be returning next year (or this year, actually).


Ingredients
3 cups all-purpose flour
1 tsp. baking soda
1/2 tsp. baking powder
1 (3.4 oz) package Jell-O pistachio instant pudding and pie filling mix

1 cup butter, at room temperature
1 1/2 cups white sugar
2 eggs, at room temperature
1 tsp. vanilla extract

1 cup (shelled) roasted, salted pistachios, finely chopped
1/2 cup dried cranberries, finely chopped


Directions
1. Preheat oven to 350 degrees.
2. Sift together the flour, baking soda, baking powder and pudding mix.
3. In a medium bowl, combine the butter and sugar until light and fluffy.
4. Add the eggs and vanilla extract, one at a time, beating after each addition.
5. Add the dry ingredients to the wet ingredients, beating until just combined.
6. Stir in the chopped pistachios and cranberries.
7. Drop by the spoonful onto a parchment-lined baking sheet.
8. Bake 8-10 minutes or until just baked.
*Note: don't overbake them! When you remove them from the oven, they won't look like they're done, but let them cool and they'll be just right.

Creamy Chicken Pockets

I have memories of my mom heating up chicken pot pie when I was a little kid, and I have long desired to find a recipe that conjurs up the same taste and smell (like this one, which was good, no doubt). As I write this, I realize I could just ask my mom for hers, but 1) she hasn't made it in a long time and 2) things still just taste better when my mom makes them! But I came across this recipe on Pinterest and, after making several changes, I realized I have an easy version of chicken pot pie that may not be the same as my mom's but is still stinkin' good.


Ingredients
3 boneless skinless chicken breasts, diced
1/2 large onion, finely chopped
2 large carrots
1/2 bag frozen peas
3 cloves garlic, minced
1 tbsp. butter, at room temperature
3 oz. cream cheese, softened
Salt and black pepper
Blend of dried herbs (any that you like)
Olive oil
2 tbsp. milk
8 oz. refrigerated butter crescent rolls


Directions
1. Preheat the oven to 375 degrees and line a baking sheet with parchment paper.
2. Dice the chicken breasts into bite-size cubes and season with salt, black pepper and dried herbs.
3. On another cutting board, dice the onions and carrots. Mince the garlic.
4. In a large skillet, heat olive oil over medium heat.
5. Saute the chicken until brown. Set aside.
6. Saute the onion and carrots until tender, adding the garlic and peas in the last few minutes.
7. In a medium bowl, beat the cream cheese and softened butter until smooth.
8. Stir in the chicken and vegetables. Add the milk and season with salt and pepper.
9. Divide the crescent roll dough into eight triangles and place a generous amount of filling onto each. Fold the corners up and around to seal, pressing firmly.
10. Transfer to the baking sheet and bake for 12-15 minutes until golden brown.

Saturday, January 28, 2012

Blue Moon Cupcakes

There is no better feeling than to cook for others something they enjoy. When I picture a perfect evening, it's preparing a meal all the way through, from appetizers and salads to dessert, and having close friends over for great conversation, and maybe some games. So when I came across this recipe for cupcakes with Blue Moon over here at Miss Make, I immediately thought of Gagi, who loves to have a Blue Moon with an orange. And when she came to Chicago for her birthday this past New Year's weekend, while I was also visiting, I jumped at the chance to celebrate her with these tasty-wheaty-orangey yummies. And the frosting? Oh my heaven.

Ingredients
For the cupcake batter:
3/4 cup unsalted butter, at room temperature
1 3/4 cup granulated sugar
2 1/2 cups all-purpose flour
2 1/2 tsp. baking powder
1/2 tsp. salt
3 extra-large eggs, at room temperature
1 tsp. vanilla extract
2 drops red food coloring + 10 drops yellow food coloring (optional)
1/2 tsp. orange zest
1 orange
1 cup Blue Moon beer
1/4 cup milk

For the Seven-Minute Frosting:
2 extra-large egg whites, at room temperature
1 tsp. vanilla extract
1 tbsp. freshly squeezed orange juice
1 cup granulated sugar
1/4 tsp. cream of tartar
1/3 cup water

Directions
1. Line 24 cupcake trays with white cupcake liners and set aside. Preheat the oven to 375 degrees.
2. In a medium bowl, combine the flour, baking powder and salt.
3. In a large mixing bowl, beat the butter on medium speed for 30 seconds, adding the sugar slowly. Beat for two minutes until light and fluffy.
4. Add the eggs to the butter and sugar, one at a time, mixing completely after each.
5. Add the vanilla extract, food coloring and orange zest, and beat until combined.
6. In a large measuring cup, combine the beer and milk. 
7. Alternate adding the beer and flour mixtures to the butter mixture, beating after each and ending on the flour mixture.
8. Put the batter in the cupcake liners until they are 2/3 full. 
9. Bake for 18-20 minutes until the cupcakes are golden brown and a toothpick inserted in the center comes out clean.

10. While the cupcakes cool, prepare the frosting.
11. In a small saucepan, combine the sugar, water and cream of tartar.
12. Cook over medium heat until the sugar is dissolved and the mixture is bubbling, stirring continuously.
13. In a large mixing bowl, beat the egg whites, vanilla extract and orange juice until soft peaks form. 
14. Slowly add the hot sugar mixture, beating continuously, for seven minutes until stiff peaks form.

15. Frost the cupcakes and garnish with an orange segment. Serve immediately.
*Note: the cupcakes are best on the first day, but they keep for 2-3 days. After that, the frosting beings to deflate and gets runny.
Happy birthday, Gagi!

Beef Stroganoff

Stroganoff if a Russian dish with a long history. It is traditionally a beef-based dish with a sour cream sauce served over a grain, either rice or noodles. According to my research (ahem, Wikipedia),tThe first reported Stroganoff recipe comes from a Russian cookbook in 1861, which called for lightly floured beef cubes cooked with mustard and beef bouillon, finished with sour cream. Then, in 1912, another recipe introduced onions and tomato paste to the stroganoff game and served it over crispy potatoes. In 1938, the recipe transitioned more to what we know as stroganoff today, which left out the tomato paste and called for beef strips, rather than cubes. My first exposure to Beef Stroganoff was in college with the Pasta Sides version. Now that I'm done with college (ahem, undergrad...yes, I'm STILL in school), and I have access to a clean kitchen and more than just a mini-fridge and dorm microwave, I figured I'd try the grown-up version. And it was worth it! I adapted this recipe from one I found at Simply Recipes.

Ingredients
6 tbsp. unsalted butter
1 lb. top sirloin
2 large shallots
1/2 lb. cremini mushrooms
3 cloves garlic
1/8 tsp. ground nutmeg
1/2 tsp. dried sage
Salt and black pepper
1 cup sour cream, at room temperature
Splash of white wine (optional)
1/2 bag egg noodles


Directions
1. Place the beef in the freezer for 20 to 30 minutes. This will help when cutting it into thin slices.
2. While the beef is cooling, mince the shallots, thinly slice the mushrooms and mince the garlic. Set aside in separate bowls.
3. Remove the beef from the freezer and cut widthwise into very thin strips.
4. In a large skillet over medium heat, melt 1 tbsp. of the butter. When it is melted, increase the heat to medium-high heat and add 1/3 of the beef, seasoning with salt and black pepper.
*Note: make sure the skillet is hot so the beef browns quickly.
5. Cook the beef until browned on both sides and set aside.
6. Melt another 1 tbsp. of butter, and add another 1/3 of beef. Season with salt and pepper. When browned, set aside.
7. Repeat steps 5 and 6 with the last 1/3 of butter and and 1/3 of beef.
8. When all the beef is cooked and set aside, reduce the heat to medium and add the shallots to the skillet. Cook them for a couple minutes in the beef drippings and remove to the same plate as the beef.
9. Melt another 3 tbsp. of the butter and add the mushrooms and garlic. Sprinkle with the dried sage and nutmeg. Cook, stirring occasionally, until just softened, about four minutes.
10. Meanwhile, bring a pot of salted water to a boil and add the egg noodles, cooking until done.
11. Reduce the heat of the skillet to low and add the sour cream to the mushrooms.
12. Add a splash of white wine (optional) and stir, combining with the sour cream until a sauce forms.
*Note: Do not let the sour cream come to a simmer or it will curdle. Just gently heat it through, stirring continuously.
13. Stir in the beef and shallots. Season with salt and pepper, and cook until the sauce turns a dark brown.
12. Drain the egg noodles.
13. Serve the beef hot over the noodles.

Thursday, January 5, 2012

Nutella-Marshmallow Puffs

Despite my mom's passion for all things cooking and baking during my childhood, I have to admit that I think I was cheated. Nevermind the scraps of chocolate cake that I was allowed to eat for breakfast, or the extra buttercream frosting that my sister and I were permitted to lick off the beaters...or the homemade birthday cakes and endless number of school projects that somehow incorporated food (think a science project involving an alligator made of artichoke leaves).


The tragedy? I hadn't tasted, or even heard of, Nutella until just a couple of years ago. I know, I know...sad, right? But trust me. I've made up for lost time.


I love this recipe, not only because it involves my favorite chocolate-hazelnut cream but because it only requires three ingredients. Well, five, if you're counting an egg and some sugar for sprinkling. They are fail-proof, and so easy to throw in the oven before company arrives...or, in my case, a friend coming over to cram for first semester finals.


Ingredients
1 package Pepperidge Farm puff pastry sheets
Nutella spread
Mini marshmallows
1 egg white
Granulated sugar, for sprinkling


Directions
1. Thaw the puff pastry sheets according to package directions, either overnight in the refrigerator or at room temperature for approximately 45 minutes.
2. Preheat the oven to 350 degrees.
3. Cut each pastry sheet into four equal squares (you will have eight total).
4. Spoon your desired amount of Nutella into the center of each square, careful to leave a border on all sides.
5. Top the Nutella with mini marshmallows. I can usually manage 12-15 marshmallows nicely packed onto each pastry sheet.
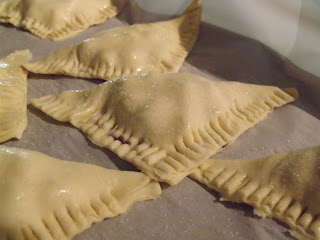
6. Fold each puff pastry sheet into a triangle.
7. Crimp the edges with a fork to form a seal.
8. Whisk the egg white with a little water, and brush over the top of each triangle. Sprinkle with granulated sugar.
9. Bake on a parchment paper-lined baking sheet for 25 minutes, or until puffed and golden brown.
10. Let cool for five minutes and serve.